

How To Fix Gray Skin In Photoshop
Summit Printing Place Order At present
Payment Methods Free Professional File Checking Services Free Proofs of Your Art Files
Correcting Peel Tone with Photoshop
Adjusting skin tone…
i of the near common photo editing tasks.
Many designers simply adjust skin tones the all-time they can, using their naked eye, but with unpredictable and inconsistent results.
Photoshop offers a uncomplicated way to measure the exact colour values in an image and right the color to a normal skin tone.
Besides ancestral background, in that location are also meaning skin tone variations inside each indigenous group. Both genetics and sun exposure also play a role in the wide spectrum of these variances, making skin tone correction one of the most challenging color correction tasks.
Although there is no "perfect" set of colour values for all ethnicities, or for all lighting situations, there are guidelines to follow to make sure the skin tones in your subject are within the range of typical skin colour for any particular ethnicity.
Photoshop gives us the tools we need to suit the color values to within the normal range of peel color for whatever particular skin tone.
Skin Color Correction "By The Numbers"

We begin by measuring the current color values of the pare tones in Photoshop with the eyedropper tool. Past measuring the color value in an image, and knowing what the "typical" skin tone value should exist, nosotros have our starting betoken. One time your image is inside the normal colour norm, you tin so adjust-to-taste, while considering the lighting circumstances, etc. for the desired results.
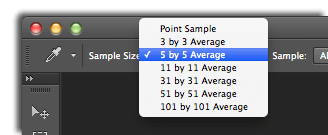
We begin by beginning checking your settings for the Centre Dropper tool in Photoshop. Make sure it is Non assail "Point Sample," equally that setting would but evaluate a 1 pixel square.
For this technique, we want to obtain a 5 X five boilerplate pixel color sample for an average color value in an expanse.

Shift-Click to Brand a Target Area
With the eyedropper tool selected, and while holding the SHIFT key, click on an surface area
that is a diffused highlight (a calorie-free area of the skin, out of the shadows, having prototype detail).
Avert the specular highlights of the epitome
(areas where the light source is reflecting off of the skin, which lack image detail).

Make a Curves Adjustment Layer
Click on the New Fill or Adjustment Layer Icon in the layers menu. In the layers Palette, select CURVES from the drop-downwardly menu of the aligning layer icon.
Skin Tone Color Values
Comparing Before and Afterwards

With your new Curves Adjustment Layer still selected, open the Info Pallet. Y'all will see 2 sets of RGB values. They stand for the colour values within the target area that yous selected by shift-clicking with the eyedropper tool.
The kickoff set of numbers is the electric current value peel color . The 2d set of numbers volition show y'all the resulting changes when you conform the colour values using the curves adjustment layer.
In the primary carte, the image itself should be in RGB Color
Epitome > Mode > RGB Colour Mode
however, we want the Info Palette to bear witness CMYK values (instead of RGB values).
Depending on your version of Photoshop, you may need to click on the petty eyedropper in the info pallet and change it to CMYK. We are now fix to brainstorm irresolute the skin tone color.
Correction Peel Colour
Evaluating Color Values of Skin Tone by the CMYK Numbers
We are now prepare to begin manipulating the skin tones. By making adjustments in the Curves Adjustment Layer, nosotros then view the results of how those adjustments effected the CMKY values in the Info Palette.

Nosotros chose "RGB Colour Mode" so at that place are only iv possible curve adjustments to simplify the process (would be v if in CMYK Mode).
The first selector is the RGB channel, which effects all of the colors globally (either darker or lighter). We can too select the individual channels (reddish, green & blueish) to brand targeted color changes.

Recollect the numbers on the right are our "new" values after nosotros accept tweaked the values in the curves dialogue box, and the numbers on the left are our original values nosotros are trying to correct.
Adjusting Caucasian Skin Tones Accurately

Under typical lighting conditions, Caucasian Skin Tone should take CMYK color values ratios in this general range:
Magenta and Yellow values should exist nearly the same, only with slightly more Yellow than Magenta. Cyan should be between ⅕ to ⅓ of the Y and K numbers. Caucasians should take 0 black in the "highlight areas".
One time the individual R-G-B channels have been adjusted to attain an accurate overall tone, changing main RGB channel will outcome the "saturation levels" to alter tones for a more fair-skin, or a more than tanned look.
Example Curves Adjustments Made in this Image to Correct the Peel Tone

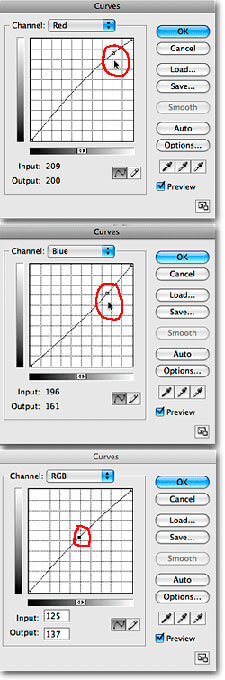
We began to adjust the curves in the various channels to get the numbers "in range."
Since the sample we targeted with the eyedropper was a highlight, make your adjustment bespeak in the highlight surface area (right side) of the curves adjustment dialogue box.
As we inspect the values in this example, the just colour that is significantly out of range is the Cyan, which is too high.
Think that the Cyan should be no more than ⅓ of the values of Magenta and Yellowish.
In this example prototype, the original Cyan value is 16, whereas the Magenta is 34 & Yellow is 36. We know the Cyan is too high since it'south current value of 16, and when multiplied 16 Ten 3 = 48, way more the Magenta and Yellow numbers.
NOTE – when you adjust ane channel, it also effects the other channels too, and then yous demand a scrap of back-and-along to get it right.
In this example, to get the numbers inside the "normal range" the red aqueduct was adapted up a scrap, and the bluish channel adjusted down. After the adjustments were made information technology appeared a little over-saturated, so the global prototype was lightened slightly lightening the color saturation in the RGB channel.
When making your adjustments in the curves dialogue box, y'all might find information technology helpful to think of the channels as: the blueish-yellow channel, the green-magenta channel, and the red-cyan aqueduct, as that is what they really outcome.
Caucasian Skin Tone Variations
Most Caucasians fall in the range of 5-20% more xanthous than magenta. A light skinned Caucasian adult could be as low every bit 20% magenta, 25% yellow. Bronzed Caucasian could be as high as 45% magenta, 62% yellow. A off-white-skinned, pink baby could be as light as 15% magenta, 16% yellow.
Common Peel Tone Examples
Various Ethnicities and Tints
Hither are a few examples of some CMYK values for various ethnicities and saturations of skin tone, but remember that these values can vary widely, then take them as a very loose guideline only. It's easy to oversaturate African-American skin, so be careful there. Asian and Hispanic skin will typically have ten-twenty% higher yellow than magenta.

Lt. Caucasian
C= 3 M=15
Y=16 K= 0

Caucasian
C= 6 Yard=27
Y=32 Thousand= 0

Dk. Caucasian
C=17 M=50
Y=58 K= 0

Asian
C= 8 M=30
Y=48 K= 0

Lt. Black
C=21 One thousand=53
Y=69 K= 3

Dk. Black
C=46 Chiliad=67
Y=77 1000=50
Pare Tone Concluding Adjustments
Following these CMYK guidelines will aid to make certain the peel tones in your subject are within the range of typical skin color. From there but use your all-time judgment to fine tune the image. Remember, if you intend to print the photos, change your images to CMYK color mode, as output devices and commercial printing companies can not impress in RGB. Run across Colour Gamma.
Credits and Recognition

The above skin tone color correction technique is an adaptation of a Lynda.com training video by Chris Orwig. Chris is a photographer, writer, speaker and teacher. If y'all have your Photoshop training seriously, we highly recommend Chris's preparation. His employ of adjustment layers is truly amazing! A word of warning, his enthusiasm regarding Photoshop (and life in full general) is contagious.
Demand Graphic Pattern Assist?

If your company doesn't take a graphic designer, Summit Printing has professional graphic designers on staff that tin aid you!
If you have any questions virtually our services, need a price quote, or want to speak with an skilful for some questions about press or graphic design, please don't hesitate to contact us.
We will exist happy to assist you lot!
Our press company is bachelor 24/seven by telephone at 800-594-7733, Alive Conversation or email.

How To Fix Gray Skin In Photoshop,
Source: https://www.summitprintingpro.com/graphic-design/tutorials/skin-tone-correction.html
Posted by: smithplagne.blogspot.com
0 Response to "How To Fix Gray Skin In Photoshop"
Post a Comment